Overview
There are three types of campaign tools that our platform supports: standard campaigns, A/B split tests, and autoresponders. This section of our help guide will show you how to create and track these campaigns in the system.
How to Create a Standard Campaign
Standard Campaigns allow you to group multiple messages together for macro reporting.
To create a standard campaign:
- Go to: Campaigns (the paper jet icon in the left-hand navigation on the system dashboard) > Create Campaign.
- Click on the yellow Standard Campaign icon.
- Specify your campaign properties, like the campaign name, the from name that these messages come from, and the from email address. These are used as default properties for messages created within the campaign.
- Click on the orange Create Campaign button in the bottom-right corner of the screen.
- On the final confirmation screen, you can:
- Go straight to creating a new email or SMS for this campaign,
- Create a new campaign, or
- Navigate to the Campaign History page.
To select which of your existing messages you’d like to add to this campaign, click on the blue-outlined Manage Campaign button on the final screen. Then select the messages you’d like to add to this campaign by checking their relevant checkboxes.
You can filter for these messages using the search box and drop-down lists at the top of the screen.
Standard Campaign Dashboard
The Standard Campaign dashboard is located at Campaigns > Standards Campaigns. Here, you can:
View Existing Campaigns
View and search for your campaigns using the search bar, page navigation arrows, and the category navigation option on the left. At a glance, you can see how many recipients each campaign has, whether it’s active / inactive, and how many campaign emails and SMSs have been sent.

Edit a Campaign
Select the checkbox of a campaign you’d like to edit and click on the pencil icon above the right-hand viewing pane. This will open the campaign properties page (like in the campaign creation process), where you can edit the campaign name, the from name that your messages will come from, and the from email address (campaign properties are used as default properties for messages created within the campaign).
Get Campaign Reports
Select the checkbox of a campaign you’d like a report for and click on the graph icon above the right-hand viewing pane. More details on this in the Standard Campaign Reports section below.
Manage Campaign
Click on the filing icon in the top-right corner of the screen to add existing messages to a campaign. Do this by checking the relevant checkboxes and clicking Save Changes. You can also get a quick overview of those message stats, like number of recipients, clicks, opens, and the message status.
Share Campaign Reports
Click on the Share Report icon in the top-right corner of the screen to share your campaign report. You can do this via email (check the Allow data export checkbox to enable the recipient to export the data to their computers) or by copying the report link using the Copy Link tab.
Standard Campaign Reports
Standard campaign reports help you to understand how effective your standard campaigns are.
To access these reports:
- Go to: Campaigns (the paper jet icon in the left-hand navigation on the system dashboard) > Standard Campaigns.
- Select the checkbox of a campaign you’d like a report for
- Click on the graph icon above the right-hand viewing pane.
Reporting Tabs
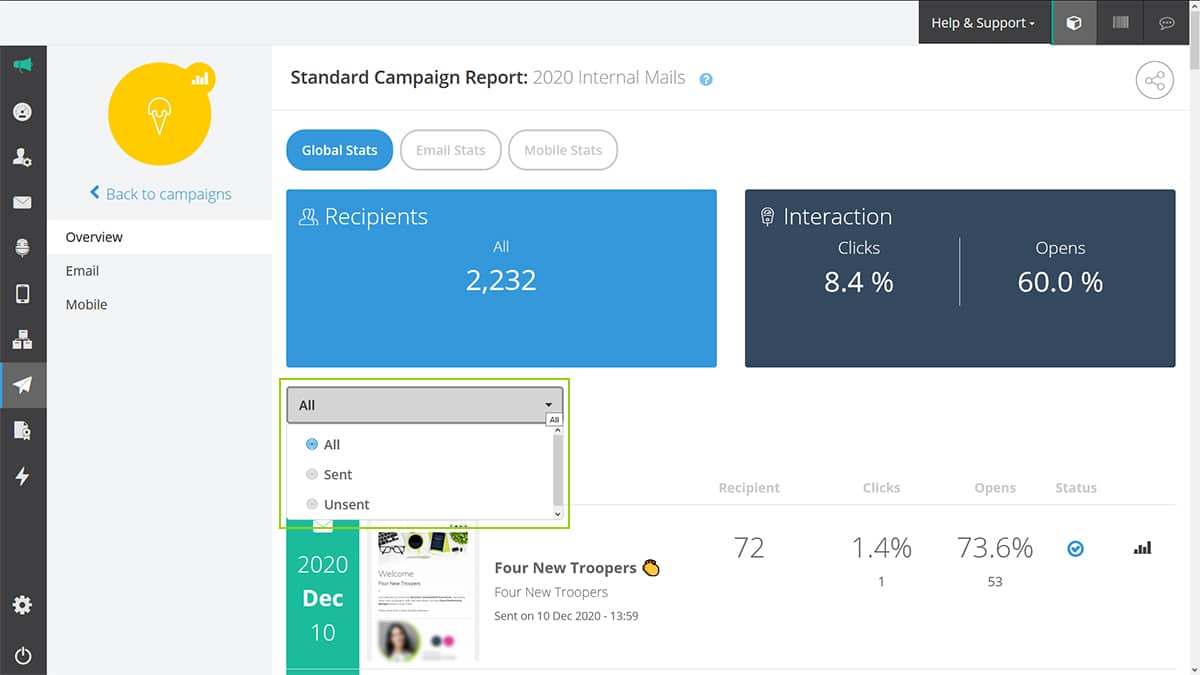
There are three tabs available on the standard campaign report. You can access different views of these reports by navigating using the tabs on the top left of the Overview page, or by using the tabs in the left-hand navigation:
- Global Stats: Basic statistics for email and mobile, a progress monitor for your campaign, and filter for a view of sent or unsent messages.
- Email stats: Total number of email recipients, clicks, opens, and platform/device use, as well as geo-location.
- Mobile stats: Number of SMSs delivered, bounced, replied to, and unsubscribed from.


