Overview
Global triggers are a new advanced trigger set in our system. They work similarly to our existing triggers but with more powerful applications.
How to Add a Global Trigger
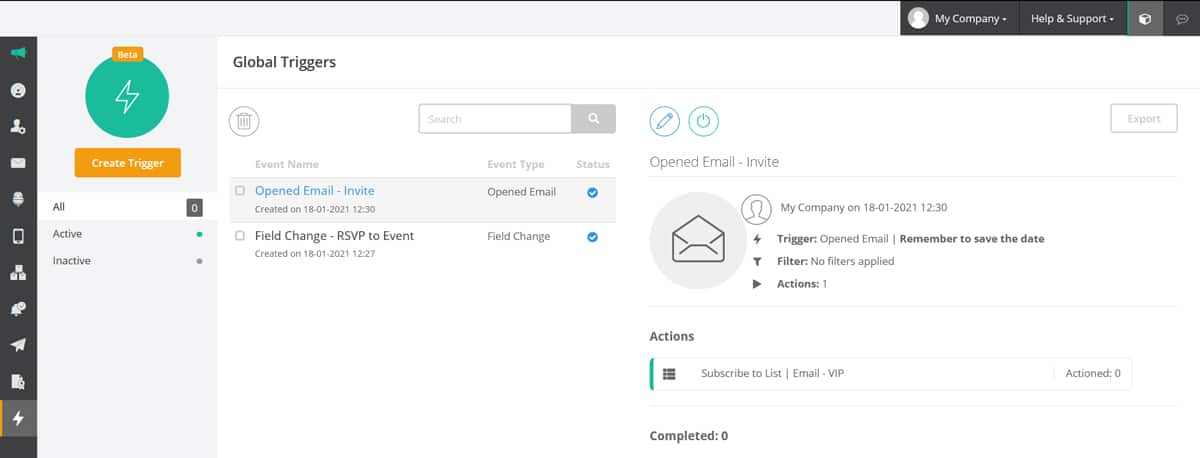
- Hover over the lightning bolt icon in the left-hand navigation bar.
- Click on New Global Triggers.
- On the Global Triggers page, click on the orange Create Trigger button in the top left of the screen.
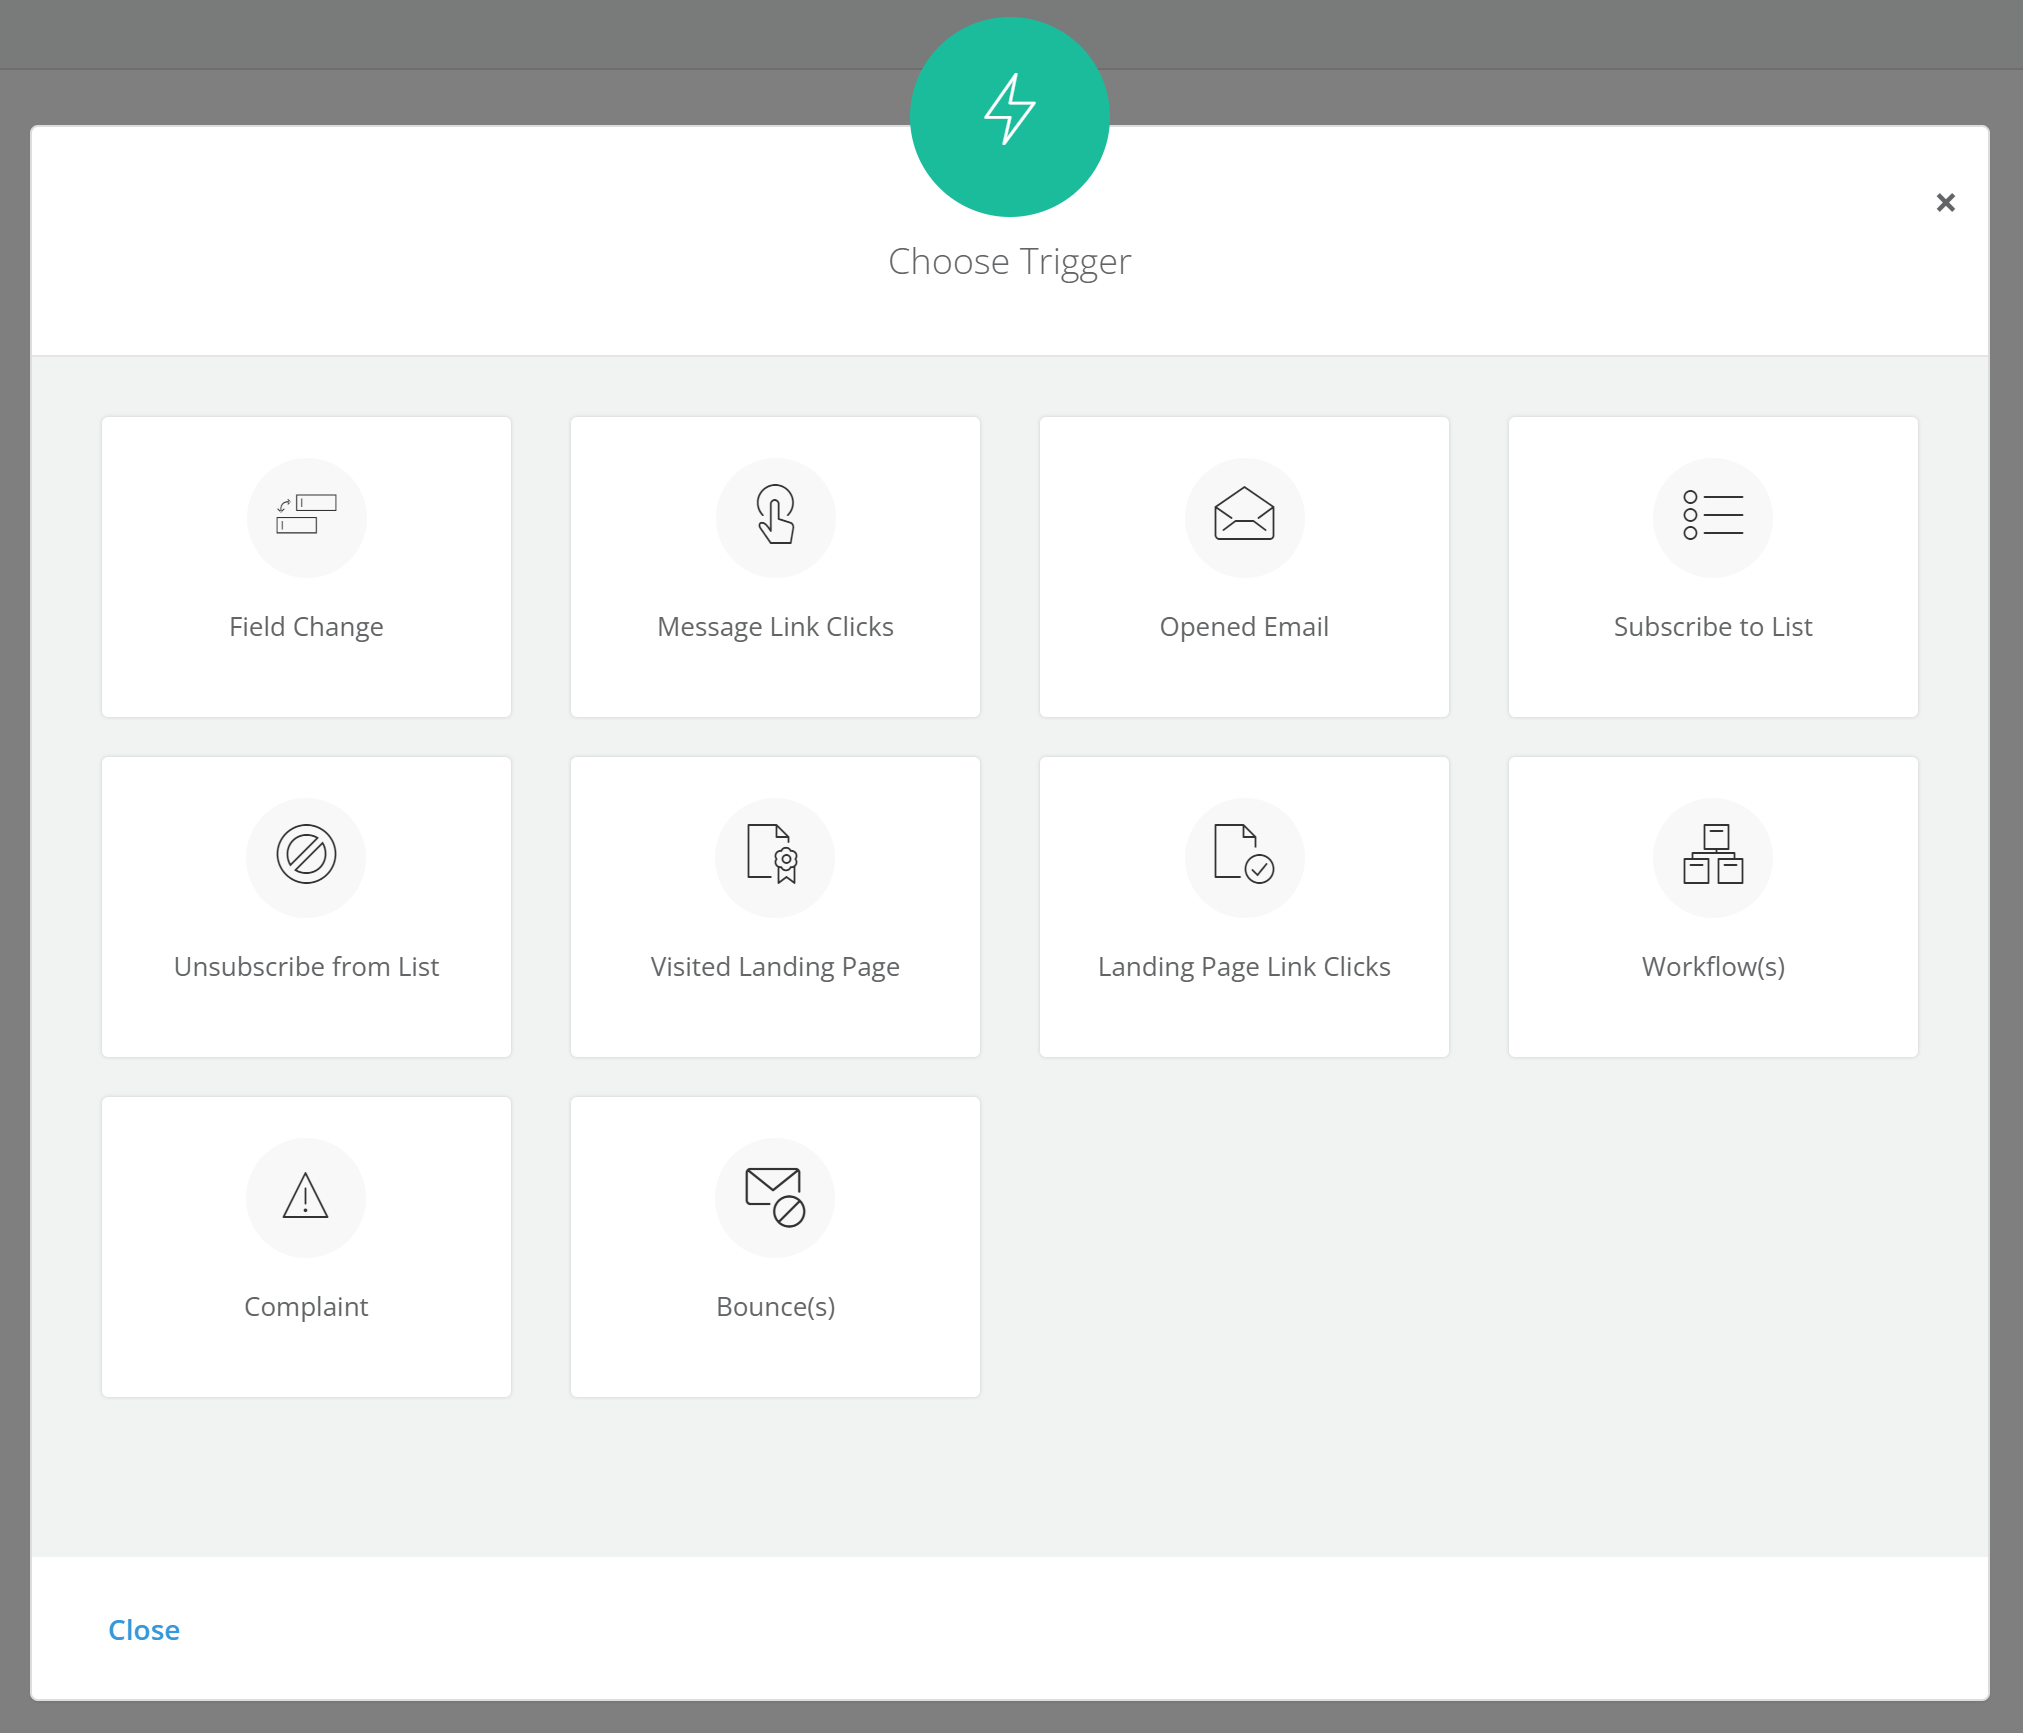
- Select the type of global trigger you’d like to create.
- If you use a global trigger on workflows, the action will already be set to add or remove the contact from a workflow. You’ll also see this trigger on the global triggers listing page.
- If you disable a trigger that is, for example, a start trigger on a workflow, the workflow will still be published and contacts who are already on the workflow will still flow through it, but no more contacts will be added via the disabled start trigger.
Field Change
Use this to trigger an action when a contact or custom field (excluding multiple choice fields) is updated – e.g.: trigger a workflow if a loyalty member’s status changes from silver to gold. It also works well for sending follow-up sequences and notifying people in your organisation that the field has been updated.
To add a field change trigger event:
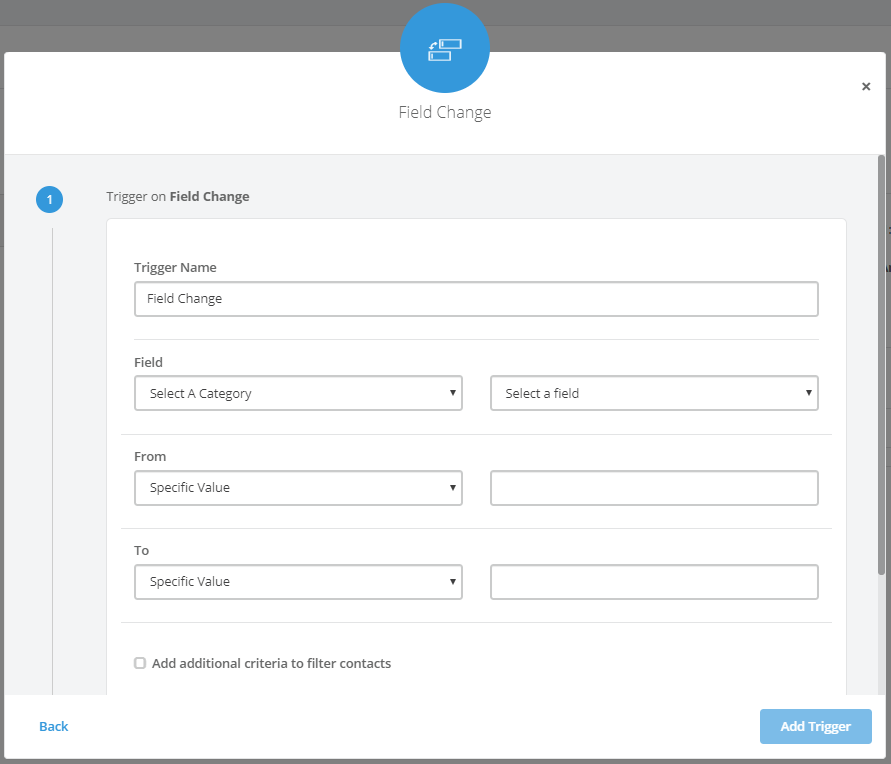
- Select the Field Change button from the Choose Trigger modal.
- Name the trigger and specify the fields you want to use for this trigger.
You can trigger an action if a field on an existing contact changes to or from any value (including empty fields) or one that you specify. The options include changes from:
- A specific value to a specific value
- A specific value to any value
- Any value to a specific value
- Any value to any value
- Click on the checkbox to add additional criteria to filter contacts if you’d like to apply this field change trigger only to certain types of contacts or specific contact lists.
- Click on the Add an Action button at the bottom of the modal. This will open another modal.
- Select the action/s you’d like to trigger. At the moment, you can add as many of the following actions as you’d like:
- Add to Workflow: Add the contact to an existing workflow and specify which node you want them to start on
- Remove from Workflow: Remove the contact from an existing workflow
- Send Autoresponder: Send the contact an autoresponder email that you’ve created in the system
- Turn Contact Off: Sets the contact status to off, so they don’t receive any further messages
- Update Contact Field: Updates the custom field with new text data (not available on multi-value fields)
- Subscribe to List: Subscribes a contact to a list (or lists) using their email and/or mobile contact details
- Unsubscribe From List: Unsubscribes a contact from one or more lists on mobile and / or email
- External Webhook: This allows you to call an external action via a URL
- When you’re finished, click Add Trigger.
Message Link Clicks
This trigger fires an action when a contact clicks a link in an email or SMS. It’s a highly adaptable trigger because you can specify the message, as well as the exact link within that message that you want it to trigger from.
To add a link click trigger event:
- Select the Link Clicks button from the Choose Trigger modal.
- When the trigger configuration modal opens, select whether you would like to trigger your specified action on one of the following options:
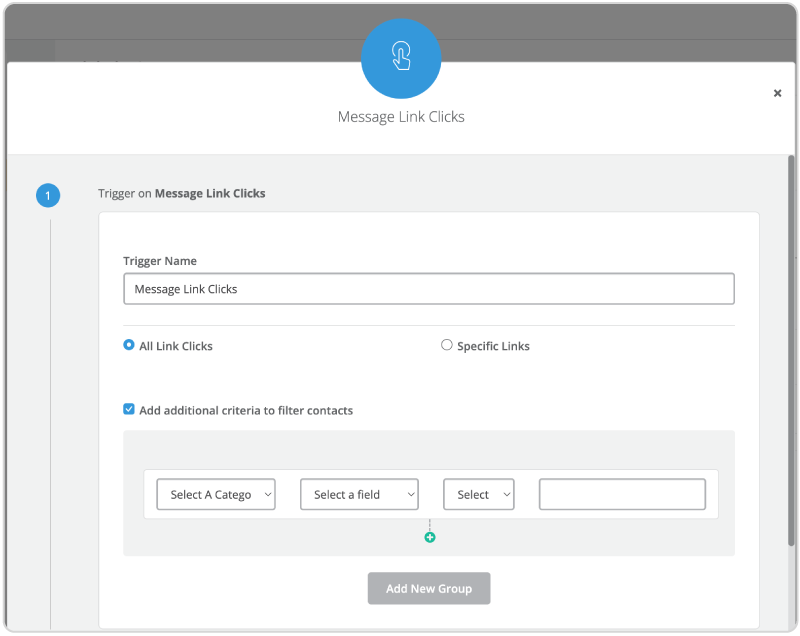
- All Links (New and Existing): This option allows you to trigger the specified action on all the links in your messages, both new and existing. To control under which circumstances the action will be triggered, select the Add additional criteria to filter contacts radio button to set filtering on this global trigger.
-
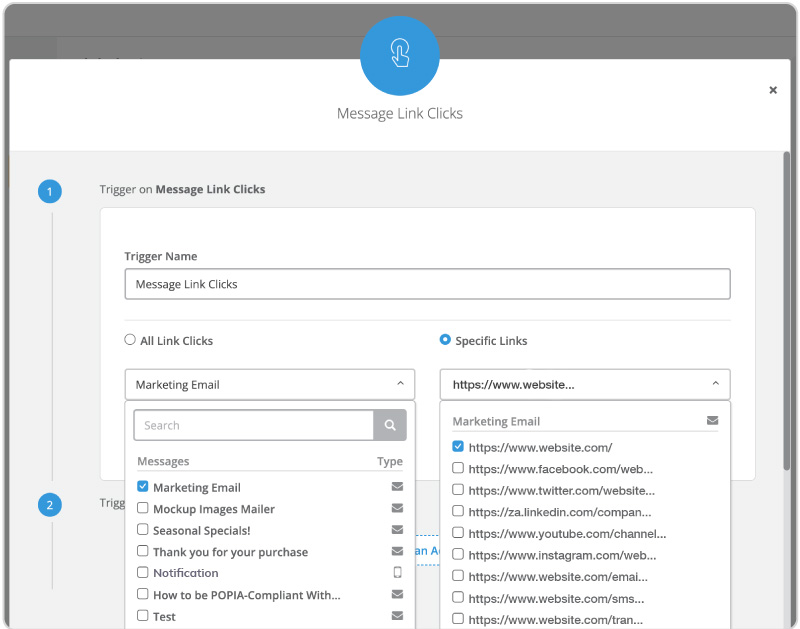
- Specific Links: This option allows you to select the email or SMS message(s) that contain the links you would like to use for triggering. After specifying the messages, you can further indicate which exact links will be used for triggering by designating them in the dropdown.
- Click on the Add an Action button at the bottom of the modal. This will open another modal.
- Select the action/s you’d like to trigger. At the moment, you can add as many of the following actions as you’d like:
- Add to Workflow: Add the contact to an existing workflow and specify which node you want them to start on
- Remove from Workflow: Remove the contact from an existing workflow
- Send Autoresponder: Send the contact an autoresponder email that you’ve created in the system
- Turn Contact Off: Sets the contact status to off, so they don’t receive any further messages
- Update Contact Field: Updates the custom field with new text data (not available on multi-value fields)
- Subscribe to List: Subscribes a contact to a list (or lists) using their email and/or mobile contact details
- Unsubscribe From List: Unsubscribes a contact from one or more lists on mobile and / or email
- External Webhook: This allows you to call an external action via a URL
- When you’re finished, click Add Trigger.
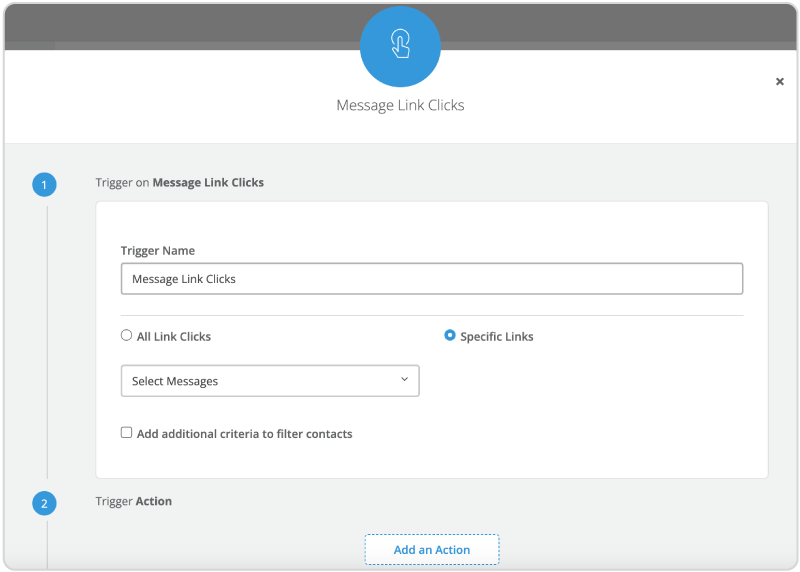
- If you have the same link in your email multiple times, it will be displayed as one link in the drop down.
- If a contact clicks this URL (anywhere in the email or SMS) it will fire the event.
- By default, this trigger will only fire once on the first unique link click from a recipient. For the trigger to fire on subsequent clicks, check the All link clicks checkbox when setting up the trigger. This feature allows recipients to trigger the Action multiple times, enabling you to achieve more flexible messaging applications, e.g., allowing recipients to vote in a poll multiple times vs. only once.
Opened Email
This start event triggers an action if contacts open specific emails.
To create one of these triggers:
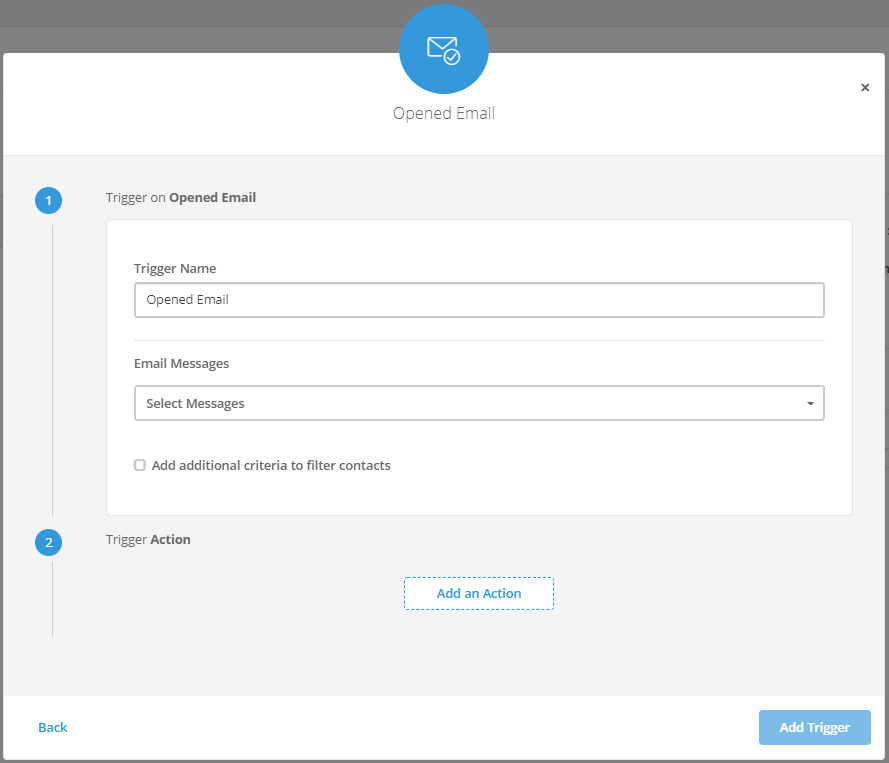
- Select the Opened Email button from the Choose Trigger modal.
- Choose the email/s you’d like contacts to have opened.
- If you’d like to only apply this to certain types of contacts, click the ‘Add additional criteria to filter contacts’ checkbox and specify which types of contacts you’d like to filter this start event by. You can add multiple filters here.
- Click on the Add an Action button at the bottom of the modal. This will open another modal.
- Select the action/s you’d like to trigger. At the moment, you can add as many of the following actions as you’d like:
- Add to Workflow: Add the contact to an existing workflow and specify which node you want them to start on
- Remove from Workflow: Remove the contact from an existing workflow
- Send Autoresponder: Send the contact an autoresponder email that you’ve created in the system
- Turn Contact Off: Sets the contact status to off, so they don’t receive any further messages
- Update Contact Field: Updates the a custom field with new text data (not available on multi-value fields)
- Subscribe to List: Subscribes a contact to a list (or lists) using their email and/or mobile contact details
- Unsubscribe From List: Unsubscribes a contact from one or more lists on mobile and / or email
- External Webhook: This allows you to call an external action via a URL
- When you’re finished, click Add Trigger.
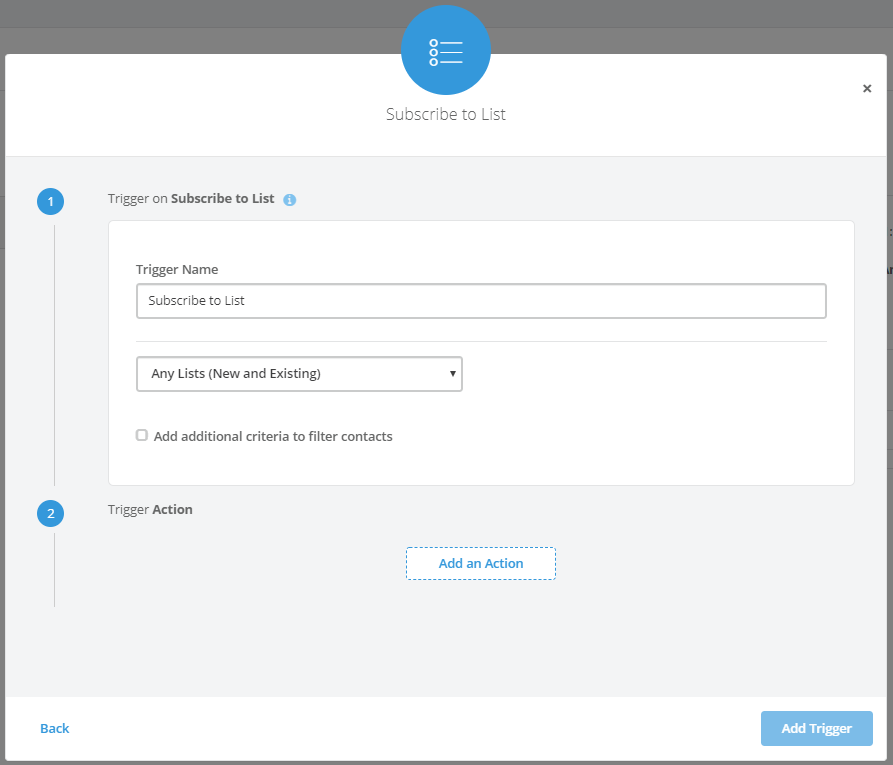
Subscribe to List
This trigger fires an action if contacts subscribe to one or more contact lists.
To create one of these triggers:
- Select the Subscribe to List button from the Choose Trigger modal.
- Use the drop-down to specify if you’d like the trigger to work when someone subscribes to all your new and existing lists, or if you’d like it to apply only to specific lists.
- If you choose specific lists, another drop-down list will appear. Here, select the specific lists you’d like the trigger to apply to.
- If you’d like to only apply this to certain types of contacts, click the ‘Add additional criteria to filter contacts’ checkbox and specify which types of contacts you’d like to filter this start event by. You can add multiple filters here.
- Click on the Add an Actionbutton at the bottom of the modal. This will open another modal.
- Select the action/s you’d like to trigger. At the moment, you can add as many of the following actions as you’d like:
- Add to Workflow: Add the contact to an existing workflow and specify which node you want them to start on
- Remove from Workflow: Remove the contact from an existing workflow
- Send Autoresponder: Send the contact an autoresponder email that you’ve created in the system
- Turn Contact Off: Sets the contact status to off, so they don’t receive any further messages
- Update Contact Field: Updates the a custom field with new text data (not available on multi-value fields)
- Subscribe to List: Subscribes a contact to a list (or lists) using their email and/or mobile contact details
- Unsubscribe From List: Unsubscribes a contact from one or more lists on mobile and / or email
- External Webhook: This allows you to call an external action via a URL
- When you’re finished, click Add Trigger.
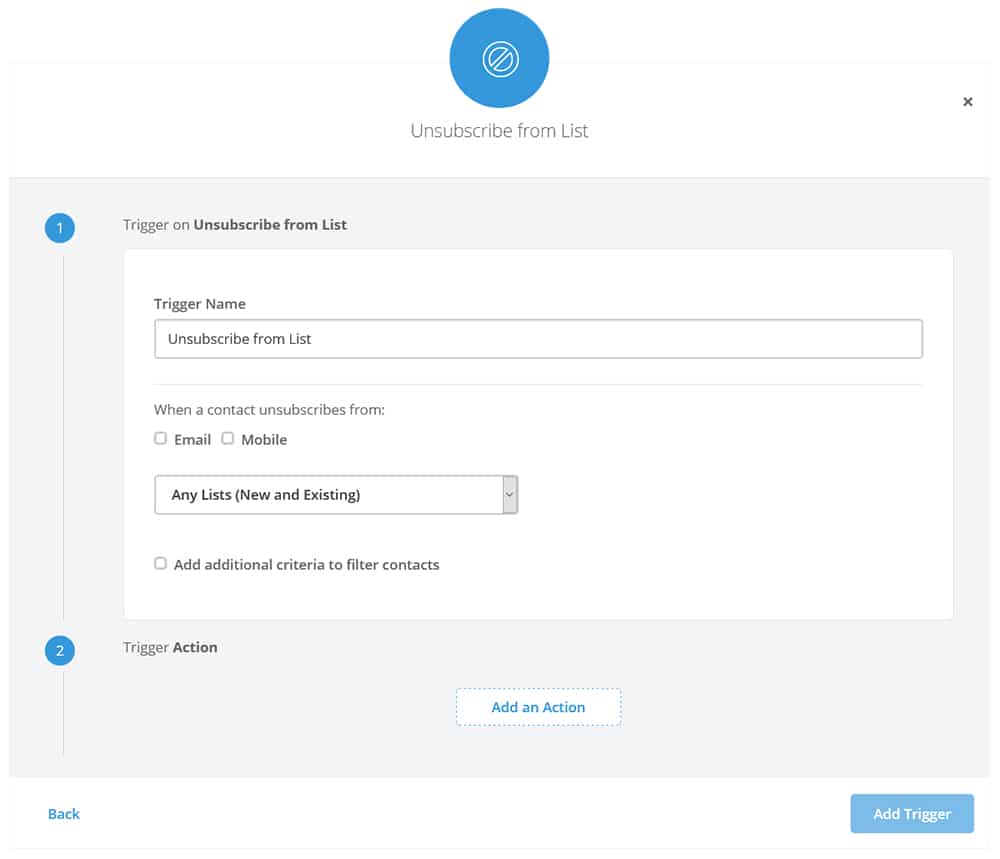
Unsubscribe from List
This trigger fires an action if contacts unsubscribe from one or more contact lists.
To create one of these triggers:
- Select the Unsubscribe from List button from the Choose Trigger modal.
- Name your trigger. The default name is Unsubscribe from List.
- Select whether you’d like the trigger to fire when a contact unsubscribes from email, mobile, or both.
- Use the drop-down to specify if you’d like the trigger to work when someone unsubscribes from all your new and existing lists, or if you’d like it to apply only to specific lists.
- If you choose specific lists, another drop-down list will appear. Here, select the specific lists you’d like the trigger to apply to.
- If you’d like to only apply this to certain types of contacts, click the ‘Add additional criteria to filter contacts’ checkbox and specify which types of contacts you’d like to filter this start event by. You can add multiple filters here.
- Click on the Add an Action button at the bottom of the modal. This will open another modal.
- Select the action/s you’d like to trigger. At the moment, you can add as many of the following actions as you’d like:
- Add to Workflow: Add the contact to an existing workflow and specify which node you want them to start on
- Remove from Workflow: Remove the contact from an existing workflow
- Send Autoresponder: Send the contact an autoresponder email that you’ve created in the system
- Turn Contact Off: Sets the contact status to off, so they don’t receive any further messages
- Update Contact Field: Updates the a custom field with new text data (not available on multi-value fields)
- Subscribe to List: Subscribes a contact to a list (or lists) using their email and/or mobile contact details
- Unsubscribe From List: Unsubscribes a contact from one or more lists on mobile and / or email
- External Webhook: This allows you to call an external action via a URL
- When you’re finished, click Add Trigger.
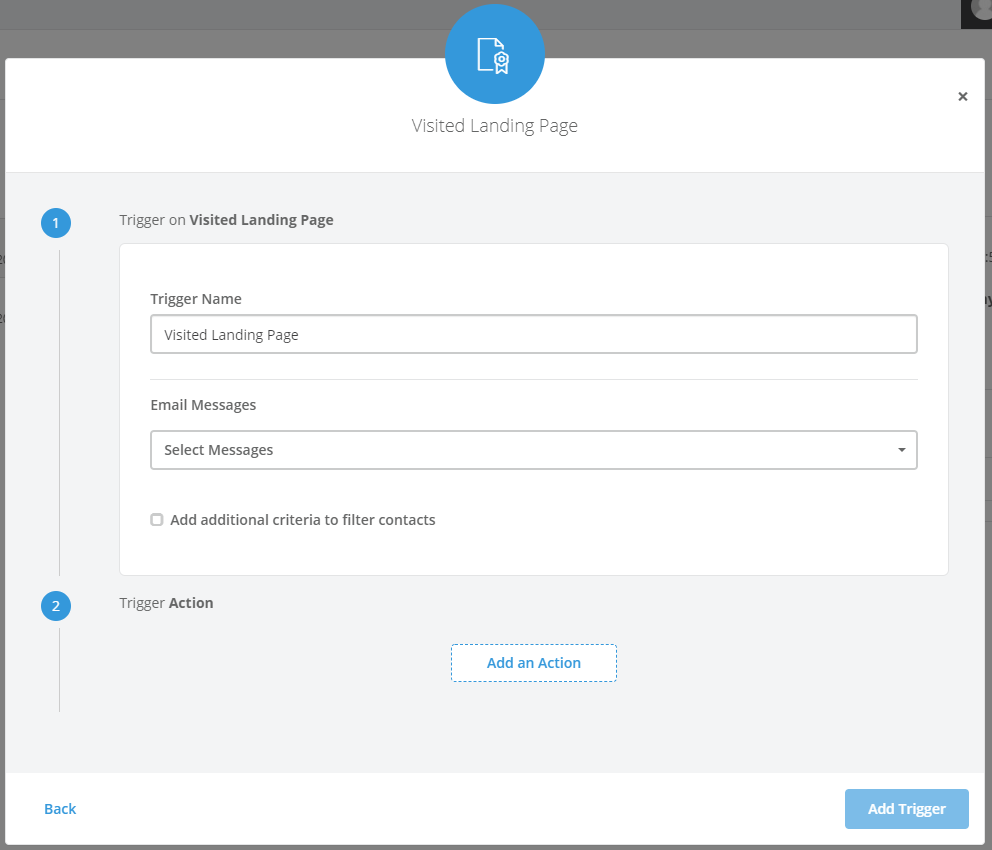
Visited Landing Page
This start event triggers an action if contacts (not anonymous visitors) have visited specific landing pages created on our platform.
To create one of these triggers:
- Select the Visited Landing Page button from the Choose Trigger modal.
- Choose the landing page/s from the drop-down that you’d like contacts to have visited.
- If you’d like to only apply this to certain types of contacts, click the ‘Add additional criteria to filter contacts’ checkbox and specify which types of contacts you’d like to filter this start event by. You can add multiple filters here.
- Click on the Add an Action button at the bottom of the modal. This will open another modal.
- Select the action/s you’d like to trigger. At the moment, you can add as many of the following actions as you’d like:
- Add to Workflow: Add the contact to an existing workflow and specify which node you want them to start on
- Remove from Workflow: Remove the contact from an existing workflow
- Send Autoresponder: Send the contact an autoresponder email that you’ve created in the system
- Turn Contact Off: Sets the contact status to off, so they don’t receive any further messages
- Update Contact Field: Updates the a custom field with new text data (not available on multi-value fields)
- Subscribe to List: Subscribes a contact to a list (or lists) using their email and/or mobile contact details
- Unsubscribe From List: Unsubscribes a contact from one or more lists on mobile and / or email
- External Webhook: This allows you to call an external action via a URL
- When you’re finished, click Add Trigger.
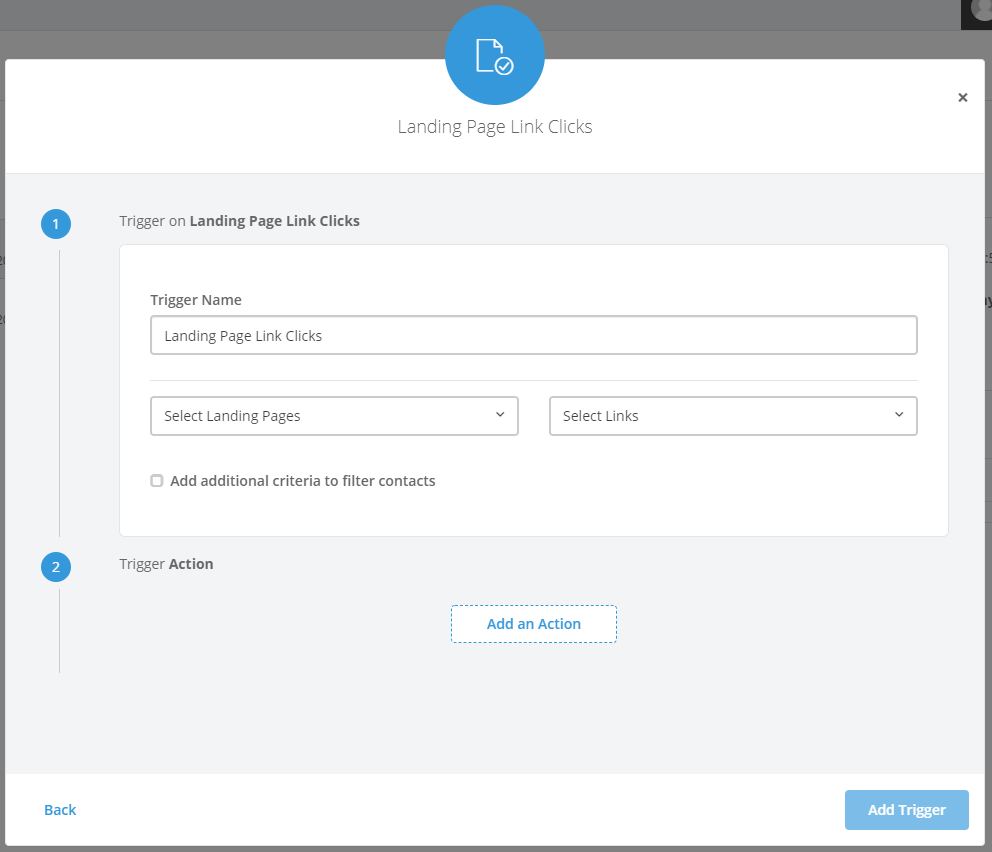
Landing Page Link Clicks
This start event triggers an action if contacts (not anonymous visitors) have clicked on specific links landing pages created on our platform.
To create one of these triggers:
- Select the Landing Page Link Clicks button from the Choose Trigger modal.
- Choose the landing page/s from the drop-down that you’d like contacts to have visited.
- Specify the links you’d like the contacts to have clicked on.
- If you’d like to only apply this to certain types of contacts, click the ‘Add additional criteria to filter contacts’ checkbox and specify which types of contacts you’d like to filter this start event by. You can add multiple filters here.
- Click on the Add an Action button at the bottom of the modal. This will open another modal.
- Select the action/s you’d like to trigger. At the moment, you can add as many of the following actions as you’d like:
- Add to Workflow: Add the contact to an existing workflow and specify which node you want them to start on
- Remove from Workflow: Remove the contact from an existing workflow
- Send Autoresponder: Send the contact an autoresponder email that you’ve created in the system
- Turn Contact Off: Sets the contact status to off, so they don’t receive any further messages
- Update Contact Field: Updates the a custom field with new text data (not available on multi-value fields)
- Subscribe to List: Subscribes a contact to a list (or lists) using their email and/or mobile contact details
- Unsubscribe From List: Unsubscribes a contact from one or more lists on mobile and / or email
- External Webhook: This allows you to call an external action via a URL
- When you’re finished, click Add Trigger.
Unenroll from Workflow
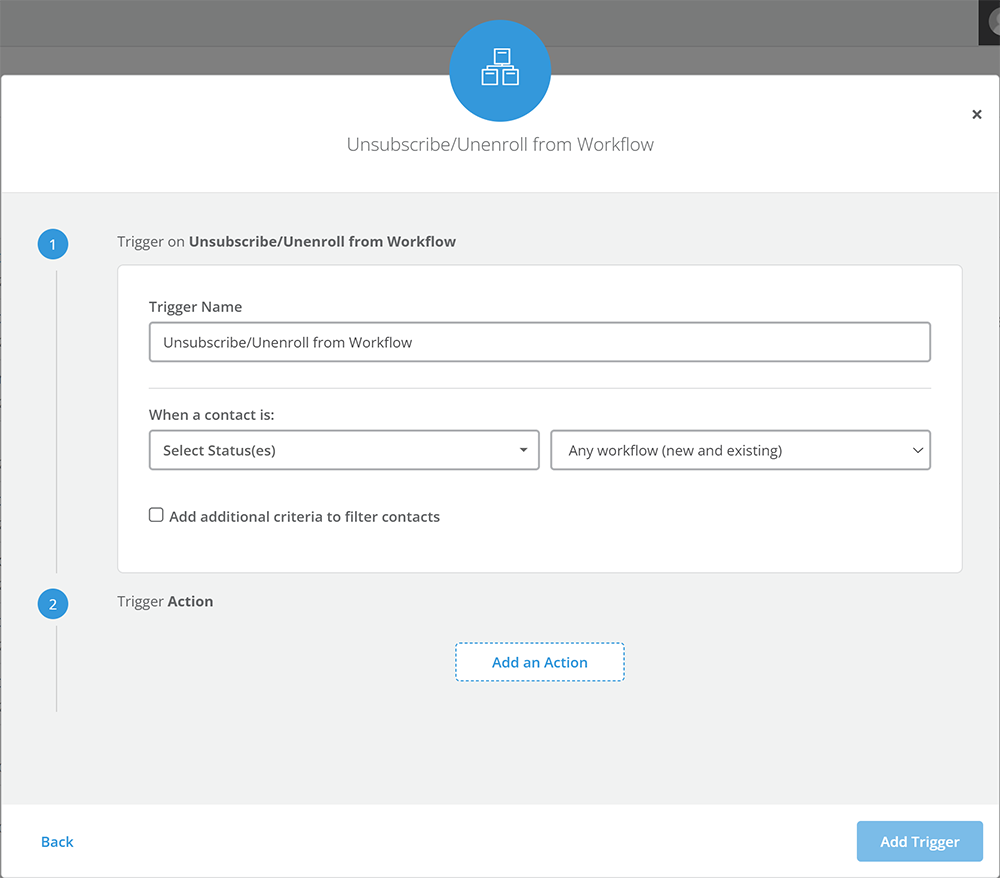
This trigger fires an action if contacts unenroll from one or more workflows.
To create one of these triggers:
- Select the Workflow(s) button from the Choose Trigger modal.
- Name your trigger. The default name is Unsubscribe/Unenroll from Workflow.
- Use the drop-down to specify if you’d like the trigger to work when someone unenrolls or unsubscribes from all your new and existing workflows, or if you’d like it to apply only to specific workflows.
- If you choose specific workflows, another drop-down list will appear. Here, select the specific workflows you’d like the trigger to apply to.
- If you’d like to only apply this to certain types of contacts, click the Add additional criteria to filter contacts checkbox and specify which types of contacts you’d like to filter this start event by. You can add multiple filters here.
- Click on the Add an Action button at the bottom of the modal. This will open another modal.
- Select the action/s you’d like to trigger. At the moment, you can add as many of the following actions as you’d like:
- Add to Workflow: Add the contact to an existing workflow and specify which node you want them to start on
- Remove from Workflow: Remove the contact from an existing workflow
- Send Autoresponder: Send the contact an autoresponder email that you’ve created in the system
- Turn Contact Off: Sets the contact status to off, so they don’t receive any further messages
- Update Contact Field: Updates the custom field with new text data (not available on multi-value fields)
- Subscribe to List: Subscribes a contact to a list (or lists) using their email and/or mobile contact details
- Unsubscribe From List: Unsubscribes a contact from one or more lists on mobile and / or email
- External Webhook: This allows you to call an external action via a URL
- When you’re finished, click Add Trigger.
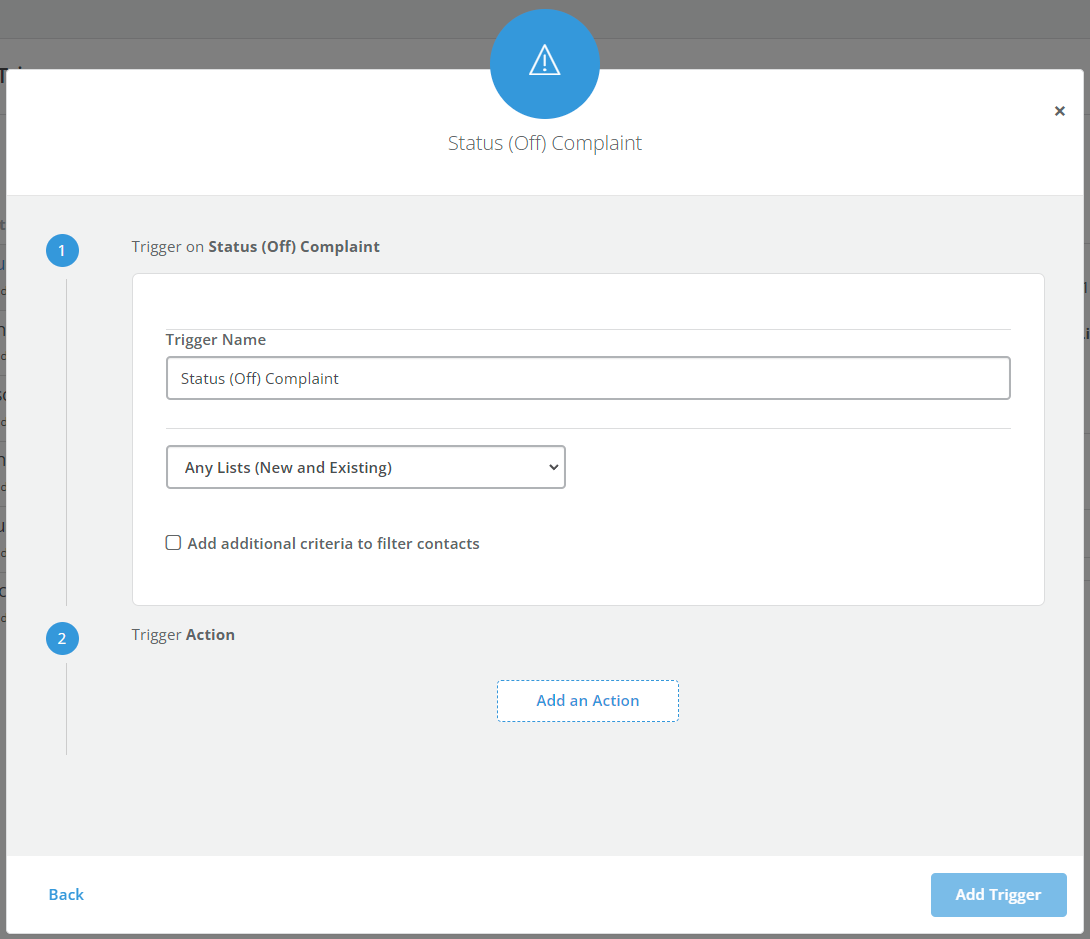
Complaint
This global trigger allows you to unenroll contacts from workflows when they mark your emails as spam.
To create one of these triggers:
- Select the Complaint button from the Choose Trigger modal.
- Use the drop-down to specify if you’d like the start event to apply to contacts in all your lists, or if you’d like it to apply only to specific lists.
- If you choose specific lists, another drop-down list will appear. Here, select the specific lists you’d like the trigger to apply to.
- If you’d like to only apply this to certain types of contacts, click the ‘Add additional criteria to filter contacts’ checkbox and specify which types of contacts you’d like to filter this start event by. You can add multiple filters here.
- Click on the Add an Action button at the bottom of the modal. This will open another modal. Select the action you’d like to trigger. At the moment, you can use this trigger to remove a contact from an existing workflow.
- When you’re finished, click Add Trigger.
Bounce(s)
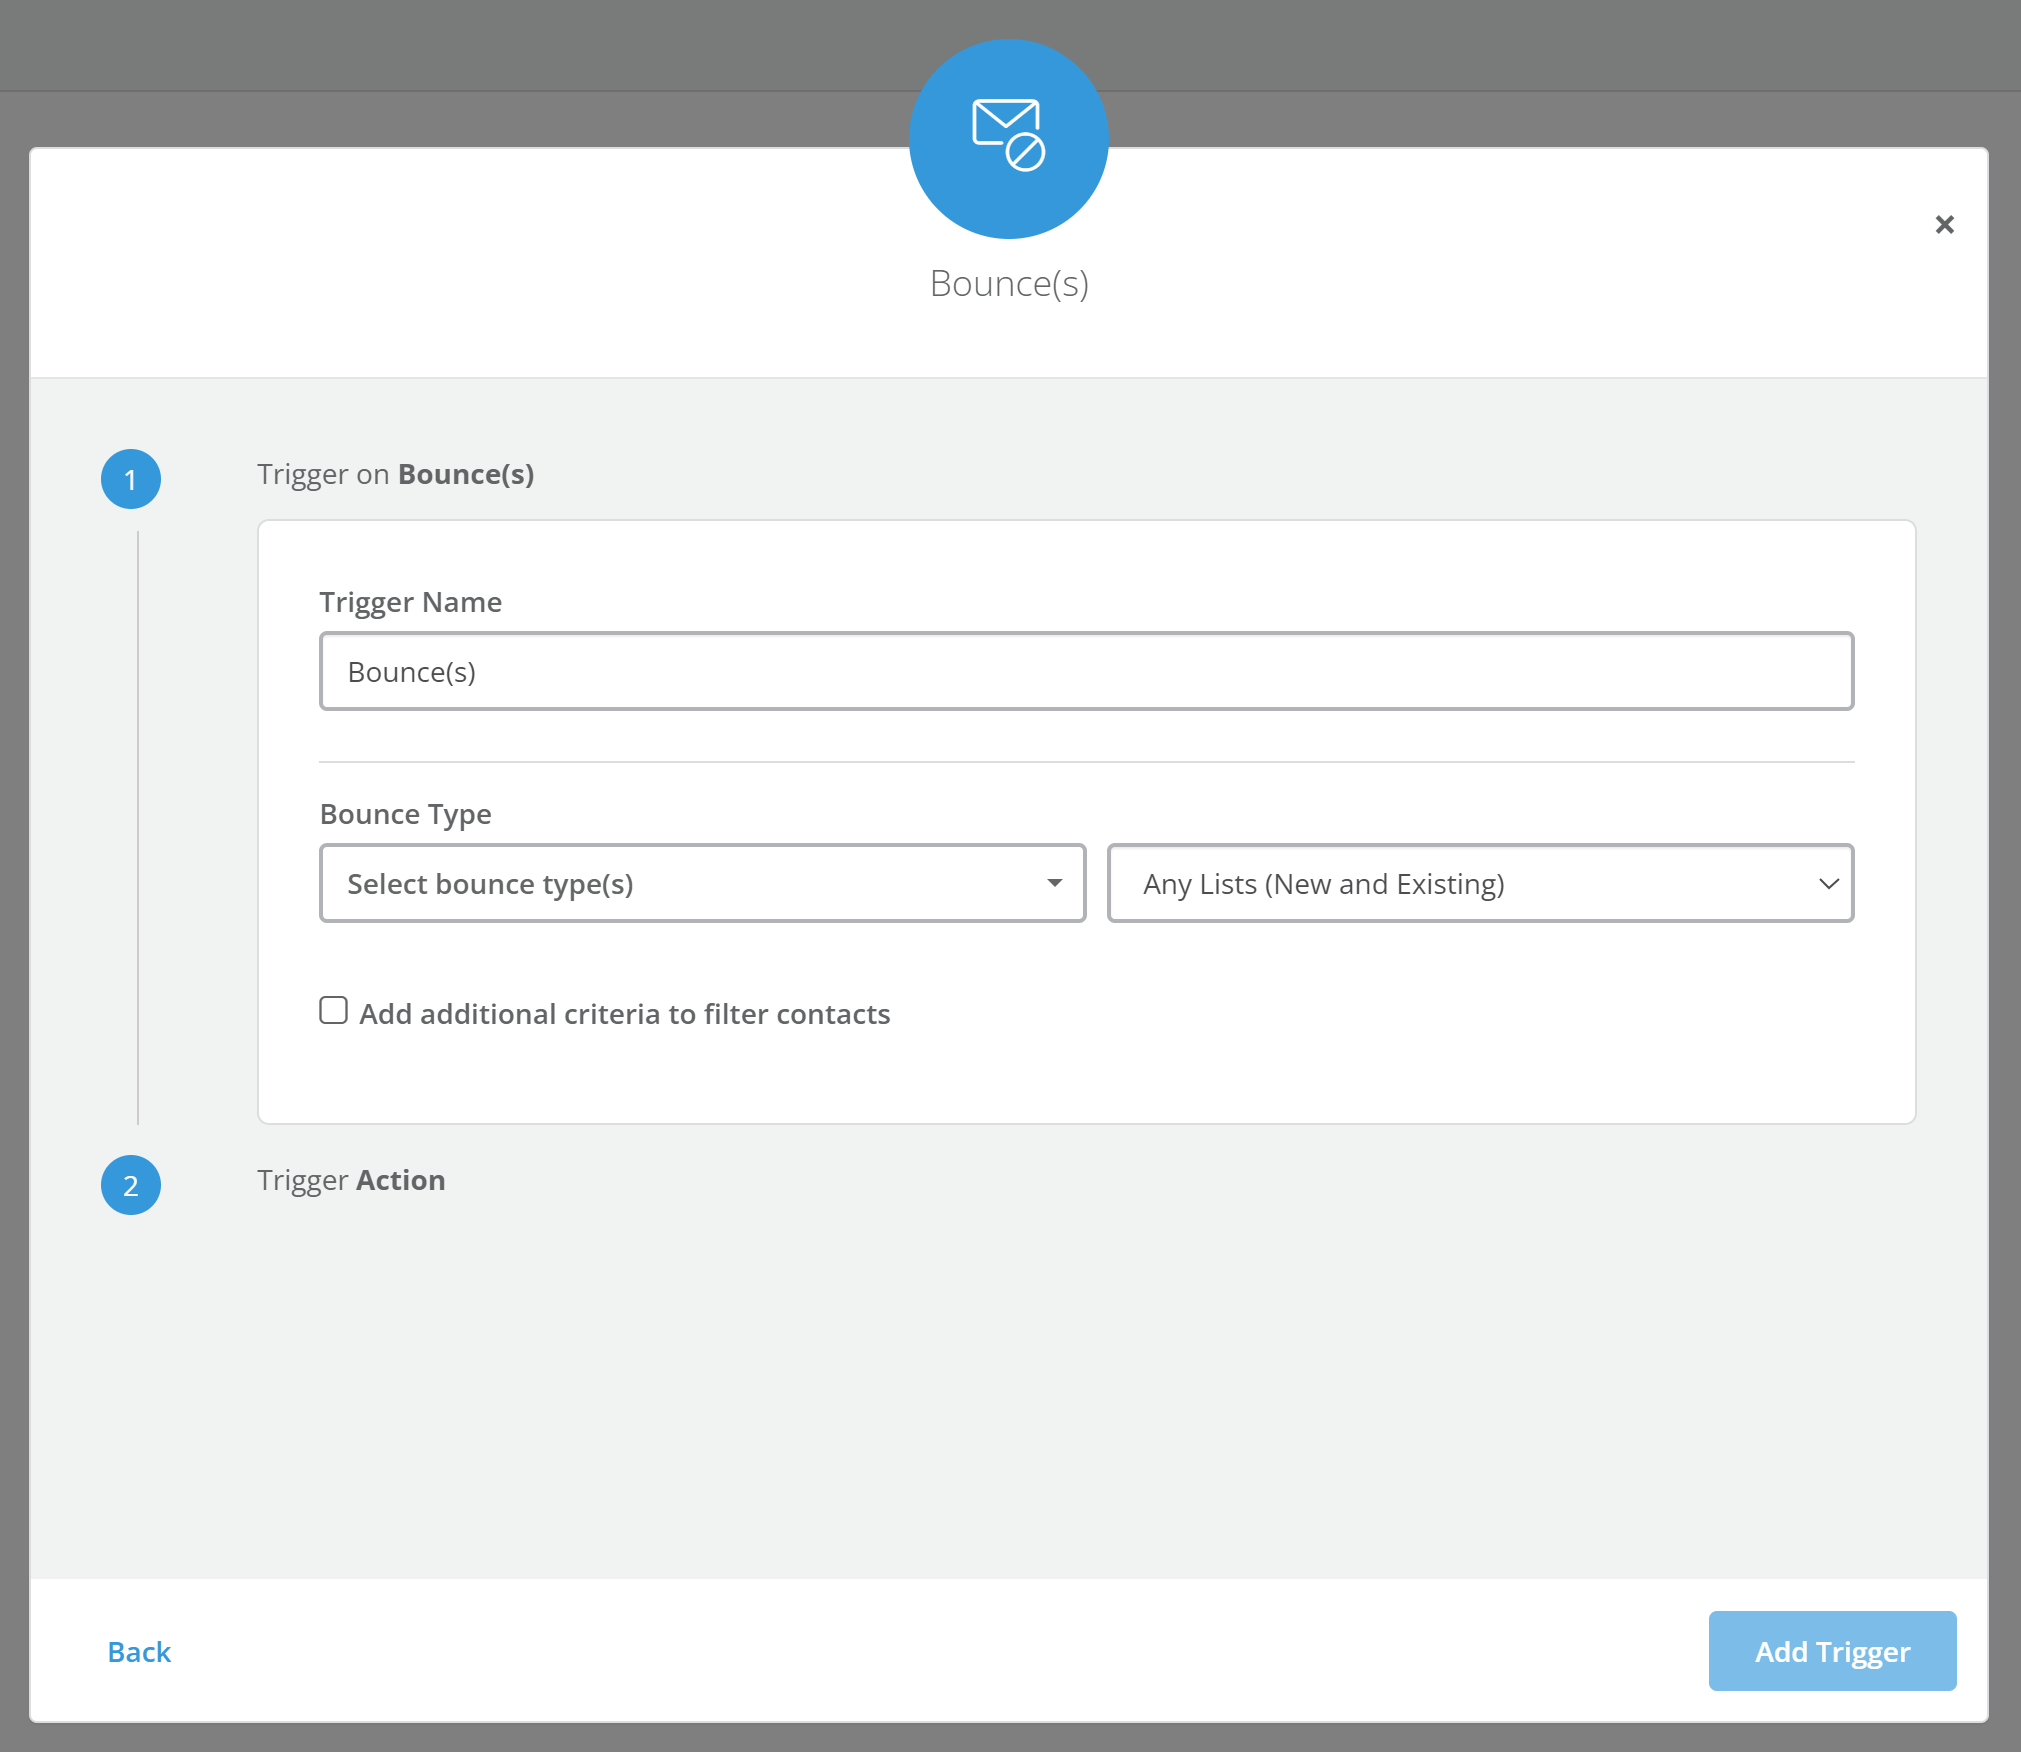
This start event triggers an action when a contact bounces on sending, or when a contact keeps bouncing a specified number of times when you send them either emails or SMSs.
To create one of these triggers:
- Select the Bounce(s) button from the Choose Trigger modal.
- Choose whether you’d like to trigger the desired action when a contact hard or soft bounces. You can select as many bounce types as are necessary, which include single bounces on email and mobile:
- Email address soft bounce
- Email address hard bounce
- Mobile number soft bounce
- Mobile number hard bounce
- In addition to triggering on single bounces, you can also set off an action if a contact keeps on bouncing a specified number of times after you send them emails or SMSs:
- Email address soft bouncing (= 20 bounces or more)
- Email address hard bouncing (= 10 bounces or more)
- Mobile number soft bouncing (= 20 bounces or more)
- Mobile number hard bouncing (= 10 bounces or more)
- Specify the contact list you’d like to trigger from.
- If you’d like to only apply this to certain types of contacts, click the ‘Add additional criteria to filter contacts’ checkbox and specify which types of contacts you’d like to filter this start event by. You can add multiple filters here.
- Click on the Add an Action button at the bottom of the modal. This will open another modal.
- Select the action/s you’d like to trigger. You can add as many of the following actions as you’d like:
- Add to Workflow: Add the contact to an existing workflow and specify which node you want them to start on
- Remove from Workflow: Remove the contact from an existing workflow
- Send Autoresponder: Send the contact an autoresponder email that you’ve created in the system
- Turn Contact Off: Sets the contact status to off, so they don’t receive any further messages
- Update Contact Field: Updates a custom field with new text data (not available on multi-value fields)
- Subscribe to List: Subscribes a contact to a list (or lists) using their email and/or mobile contact details
- Unsubscribe From List: Unsubscribes a contact from one or more lists on mobile and / or email
- External Webhook: This allows you to call an external action via a URL
- When you’re finished, click Add Trigger.
Setting Up Authentication on Webhook Actions
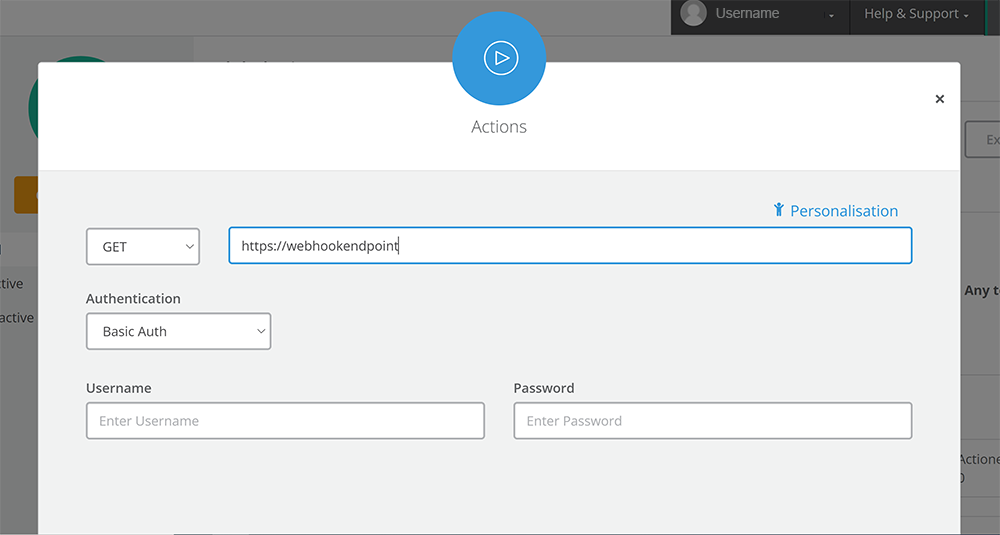
To set up HTTP authentication on external Webhook actions, do the following:
- Click on the Add an Action button in the bottom section of the global trigger you’re setting up.
- Add in the preferred Webhook settings and URL.
- In the Authentication dropdown, select Basic Auth.
- Add in endpoint access credentials (Username and Password).
- Click on the Add Action button to finalise the authentication setup.
Endpoint recipients will receive a request from our system with the necessary parameters. To validate the request, the endpoint will decode the authorization header credentials (via base64 decode) to confirm that the username / password matches.
Global Trigger Reports
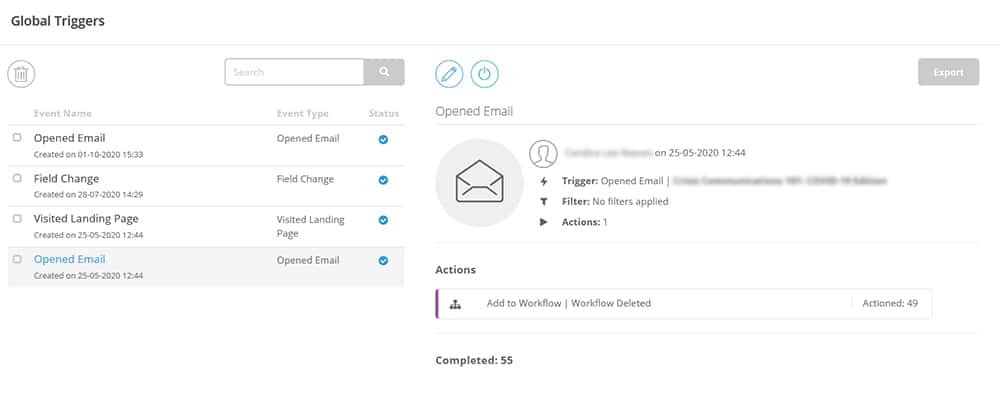
Global trigger reports enable you to view how many times each action was fired and the total number of contacts who were affected by it.
To view reports on your global triggers:
- Go to the global trigger dashboard
- Click on the trigger you want a report on. In the info panel on the right, you’ll see:
- Which actions fired
- How many times they each fired
- The completed stat that shows the number of times all the actions on the trigger fired (including the ones that failed)
- For a more detailed view, click on the grey export button in the top right of the screen. This will download a CSV report to your computer.
